Your Sewing Machine Explained
Apr 30, 2025
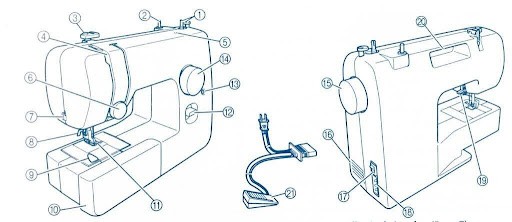
Understanding your sewing machine is the first step to becoming a confident sewist! Here's a simple guide to the main parts you'll use:

1. Bobbin Winder/Bobbin Winder Stop
Used to wind thread onto your bobbin before inserting it into the machine.
This feature stops the bobbin from winding once it's full, preventing overfilling.
A mechanism that automatically halts bobbin winding when full
2. Spool Pin
Holds your spool of thread at the top of the machine.
The thread comes off the spool and feeds into the machine.
3. Thread Guide
Guides the thread from the spool to the needle without getting tangled.
It helps keep an even tension on the thread.
Directs the thread from the spool to the needle smoothly
4. Take-Up Lever
Pulls the thread up and down during sewing.
You’ll often thread your machine through this lever.
5. Hole For Extra Spool
This holds a second spool of thread for sewing with the twin needle.
6. Tension Upper Control Dial
Controls the tightness or looseness of the top thread.
Correct tension is key for neat, balanced stitches.
7. Thread Cutter
A small blade usually located on the side or back of the sewing machine (sometimes near the needle area) that allows you to quickly and safely cut your thread after sewing, without needing scissors.
Some machines have it as a little hook you pull your thread across to snip it.
Semi domestic and more advanced machines may have an automatic thread cutter button that trims both the top and bottom threads for you!
7. Extension Table
Expands the sewing surface, providing more space for larger projects.
8. Needle Threader
Helps guide the thread through the needle’s eye for quicker threading
9. Quick Set Bobbin
10. Flat Bed Attachment with Accessory Compartment
11. Presser Foot
Presses the fabric down to ensure even stitching while sewing.
Holds the fabric flat against the feed dogs as you sew.
Different presser feet exist for different tasks, like zippers or buttonholes.
12. Reverse Stitch Button or Lever
Lets you sew backwards to reinforce the beginning and end of seams.
Also known as "backstitching."
13. Buttonhole Adjuster
Customises the size and style of buttonholes to fit various buttons
14. Pattern Group
This selector allows you to choose different stitch patterns for your project.
15. Handwheel
Moves the needle up and down manually.
Always turn it toward you to avoid damaging the machine.
16. Air Vent
The air vent allows the air surrounding the motor to circulate. Do not cover the air vent while the machine is being used.
17. Power Switch
Turns the sewing machine on or off, controlling its electrical supply.
Plug Socket - Connects your sewing machine to the power source for operation.
18. Foot Controller/Jack Socket
Plug in the foot controller plug and connect the machine to the power supply
19. Presser Foot Lever
Raises and lowers the presser foot for easy fabric handling
20. Handle
Carry the machine by its handle when transporting
21. Foot Controller
You can use this to control the sewing speed, and to start and stop sewing.
Other parts of a sewing. Can you find them on the diagram or where you think they might be:
Stitch Indicator
This shows the selected stitch pattern, ensuring you use the right one for your task.
Displays the stitch pattern currently selected for your project
Stitch Length
Adjusts the length of the stitches for different fabric types and stitching styles
Controls the size of the stitches to suit your fabric and stitching needs
Stitch Selector
Lets you choose different types of stitches (straight, zigzag, decorative stitches).
Beginners usually start with a straight stitch!
Buttonhole Lever
Activates the machine to sew a buttonhole in the selected size and style
Pressure Foot Screw
Adjusts the pressure applied by the presser foot on the fabric
Needle
The part that pierces the fabric to create stitches, available in various sizes and types.
Bobbin Cover
A protective cover for the bobbin area, keeping the bobbin secure
Holds the bottom thread of your stitches.
You insert a wound bobbin into the machine to create stitches
Needle Clamp Screw
Secures the needle in place, preventing it from loosening during sewing.
Foot Release Lever
Allows you to quickly change the presser foot with ease
Feed Dogs
Grips and moves the fabric forward under the needle while stitching
Needle Plate
The flat surface beneath the needle that guides the fabric and protects the machine.
Bobbin over Release
Releases the bobbin for easy removal when winding or changing threads.
Pedal
The foot-operated control that adjusts the speed of the machine’s stitching.
Face Cover
Protects the sewing machine from dust and damage when not in use.
Feed Dogs
Small teeth under the presser foot that move the fabric forward as you sew.
Some machines allow you to lower them for free-motion sewing.
Stitch Width
Adjusts the width of the stitches, allowing for wider or narrower designs.
Serial Number
A unique identifier for your sewing machine, often used for warranty or repairs
That’s it for now! If you think I should add anything, feel free to get in touch. Or why not share some ideas of what you'd like to see next? Next week, I'll be sharing some great starter machines for first-time sewists.